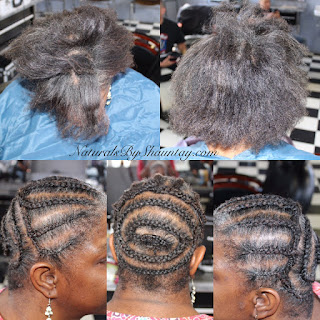
Braid Pattern for Crocheted Style
Peace & Blessings,
When God opens a door, you walk through it right?! I know I'm not the only one who thinks likes this. Thank God my aunt taught us girls how to braid! Don't get me wrong, I'm no super braider, but I do try to give the client my best rendition of their desire. I love a new opportunity.
So, when my friend asked if I could do a braid pattern for her crochet install, my response was sure send me a picture.When God opens a door, you walk through it right?! I know I'm not the only one who thinks likes this. Thank God my aunt taught us girls how to braid! Don't get me wrong, I'm no super braider, but I do try to give the client my best rendition of their desire. I love a new opportunity.
To prep:
- She had already washed, and applied Moisturize Me before blow drying, but her hair wasn't as moisturized as I wanted so I started by parting 2 sections.
- Then spritzed each section with a refresher mix, and applied a dime size of Moisturize Me oiling her parts with Grow Me Oil.
- I finger detangled, brushed, and braided. I cornrowed the front and connected the ends with a twist. For the back, I connected the end of the last top cornrow to the start of the beehive (circular position) in the back.
- I carefully used a weaving needle & thread to secure the ends of the braids also reinforcing the top connecting twists.
Once her install was complete, I came over to take some pictures for you guys. I ended up cutting it even after I took the pictures, but overall she did a great job!! She has officially inspired me to do a protective style!!
Stay tuned...... Shauntay


Comments